When you sign up for a Here Comes the Bus (HCTB) account via the app, you are automatically set up to receive push notifications on your smart device. By default, email notices are not enabled if you used the new app to create your account. (The alerts are for the arrival of the bus at your student's home bus stop, bus substitutions, exceptions to the normal school calendar, and student scans, if your school district has the Ridership module.) If you ever need to turn off notifications for a push contact or an email address — but don't want to delete the contact (such as if you are going on vacation and want to temporarily suspend alerts), or if you want to turn on a disabled notification, you can follow these steps:
Note: If you need information on how to remove a push contact or email address from your account entirely, see Deleting a Push Contact or Email Address in the New App.
For guidance on how to add push notifications for a cell phone, go to Adding a Push Contact to Your Account Using the New App. To add an email address to your account, see Adding an Email Address to Your Account Using the New App.
- Log in to HCTB. (See Logging In to the New HCTB App for details, if needed.)
The Here Comes the Bus Map screen will appear.

- Tap More on the main menu at the bottom right of the screen.
The More menu will appear, which contains pages that don't fit on the main menu.

Note: The items on this screen may be different for you, as the main menu options reflect which modules your school district has (and everything that is left is shown here). - Tap Notifications.
The Notifications screen will appear.

- Tap Settings.
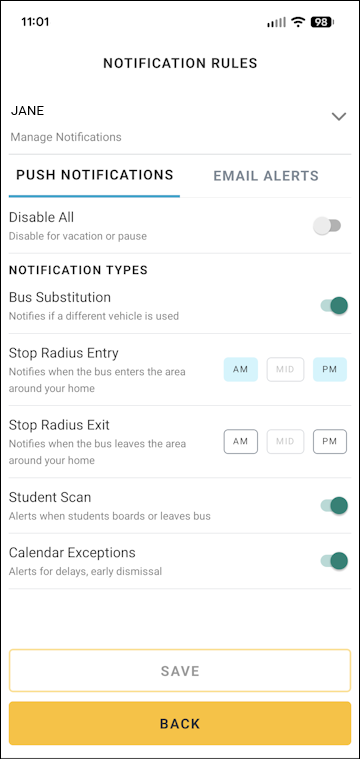
The Push Notifications tab of the Notification Rules page for your first student will appear.
Note: If you want to change your email alerts (and leave your push notifications settings as they are), you can skip down to step 12. - If you have more than one student associated with your account, and one of the others is the student whose notifications you need to change, tap your first child's name at the top of the screen and select the second child's name from the list.
PRO TIP FOR VACATION
If you are going on vacation and want to turn off ALL push notifications for the selected student, you can select Disable All at the top of the screen and then skip down to step 8.
Don't forget when you come home to turn your notifications back on again!
The primary alert types are as follows:
- Stop Radius Entry: Notifies you when your student's bus enters the notification area around your home bus stop (the radius defining how wide the circle is around the stop).
- Stop Radius Exit: Alerts you when your student's bus leaves the notification area around your home bus stop.
- Stop Radius Entry: Notifies you when your student's bus enters the notification area around your home bus stop (the radius defining how wide the circle is around the stop).
- You turn these on or off according to the time of day shown to their right — AM for the morning route, PM for the afternoon route, and MID (for some school districts) for the middle of the day. If the AM or PM is blue (
 ), it is currently selected; if it's white (
 ), it's deselected.
Tap the times of day you want to change for both Stop Radius Entry and Stop Radius Exit. (Tap white icons to turn them on and tap blue icons to turn them off.)
- For the other types of push notifications, you can tap the toggle to the right to enable or disable them. (
 means turned on, and
  turned off.) These are those types:
- Bus Substitution: Notifies you when the school district has substituted another vehicle for your student's bus (if the district makes the correct update in the software).
- Student Scan: Sends you a notice when your student scans on or off the bus (if your school district has opted for Student Ridership; see What Is Student Ridership?).
- Calendar Exceptions: Notifies you when the school district will not be following the normal bus operating schedule, such as a delay of two hours in the morning or a bus route cancellation for the whole day (if the district enters the change correctly in the software). See What Are the Calendar Exception Notifications? for details.
Caution: We recommend that you do NOT turn off Calendar Exception notifications. You'll want to be informed if your child's bus will be picking them up two hours later than usual or bringing them home 90 minutes before the normal time due to an early release.
- Bus Substitution: Notifies you when the school district has substituted another vehicle for your student's bus (if the district makes the correct update in the software).
- After making all your needed changes for the selected student, tap Save at the bottom of the screen.
A confirmation dialog box will appear.

- Tap Save Changes.
A success message will be displayed.

- Tap OK.
- If you have multiple students in your account and need to make notification changes for another student, repeat steps 5 to 10 for each of them.
IMPORTANT! The changes you just made and save will be applied ONLY for the student you chose in step 5 initially! You'll need to modify each student's notifications separately; this is designed to enable you to customize all the alerts you want to receive (or not receive) student by student. - To make changes to your email notifications, tap Email Alerts at the top of the page.
Your email settings will be displayed.

- If you are currently being sent email notices for HCTB, Opt In to Email Alerts will be selected at the top.
If you do not want to receive ANY email notifications for HCTB, tap this toggle to deselect it. ( means turned on, and turned off.)
If email alerts are turned off () but you DO want to receive them, SELECT the Opt In to Email Alerts toggle ().
- If you are receiving email alerts, you can modify what kind of bus behavior triggers a message sent to you just as you do for push notifications.
Perform steps 5 through 11 on the Email Alerts tab.
- After tapping OK for your email settings updates, tap Back on the Notification Rules screen to be returned to the Notifications page.
- Tap Back again to go back to the More menu.
- From there, you can use the main menu at the bottom of the screen to navigate to any of the new app's pages.
Note: It may take up to 24 hours for any notification changes to be reflected in Here Comes the Bus.